
Rokit – Super shiny salon nails in one easy step!
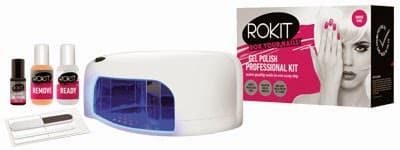
I have always loved having my nails painted and pristine. I have spent a fortune on all types of nail varnish trying to find one that does not chip or flake after a day or so or smudge before I get out of the door. The invention of gel nails was a dream come true for me, but I found it rather expensive having them done regularly at a salon and taking the gel off can cost nearly as much as putting the gel polish on. So when Rokit nails invited me to road test their home gel kit I jumped at the chance.
The kit includes an LED curing lamp, nail buffer, cuticle stick and lint free pads. Also included is Ready (you wipe your nails with this before treatment to get rid of any grease) and Remove (to take the gel off). I was also given a selection of 4 gel colours – purple couture, postbox red, bordeaux red and shock pink. All the colours are deep and vibrant and if you go on to the Rokit website they have a further selection and state they are introducing new colours all the time. There’s a colour for everyone!

I was a bit nervous so I read the instructions carefully, they were very clear and easy to read. Firstly I gave myself a manicure and made sure all the cuticles were pushed back, my nails are not very long but I shaped them as best I could. Firstly I wiped all my nails with Remove to ensure there was no greasy residue. The instruction say that thin layers of gel are better than one thick one and also very handily suggest that you do four nails on one hand first and cure, then four nails on the other hand and cure and then do your thumbs and cure and then repeat with the second layer. This was such a good idea as after you have cured the nails they are practically dry and will not smudge.
I chose bordeaux red and carefully painted my left four fingers. I am not used to such a rich colour and a little colour went on my skin, but the cuticle stick included in the set means you can swiftly wipe any marks off and carry on. I switched on the LED curing lamp and popped my nails in. It felt slightly warm but not uncomfortable, the first cure is for one minute and then you are ready for the next four fingers and thumbs. I must admit my nails looked OK after one layer but I dutifully set to putting the next layer on. This went on even easier than the first as my nails were lovely and smooth from the first layer. The second cure is to two and a half minutes and this is timed by the lamp itself. If, however, you have put the layers on a bit too thickly you can cure for another thirty seconds just to finish them off.
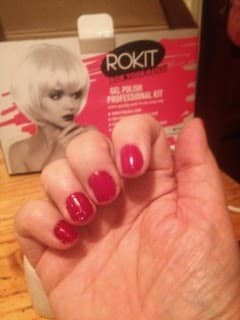
I finished all my nails with the application and curing within twenty minutes and the gel was as hard as any salon gel set I have had. The colour was beautiful, rich and deep. I think I may have put on the gel a little thickly in a couple of places but as this was my first attempt I was very pleased and was quite happy to go out that night with them done.

I left the gel on for 5 days to test it for chipping and flaking. The instructions suggest you wear gloves when using detergent etc but I did not just to see how they lasted. I am extremely pleased to report that after 5 days only one nail had a slight chip and that was one of the nails that I had put too thick a layer on. The colour and shine was as bright and shiny as the first day I put it on. I had rubbed a little cuticle oil in my nails every day and my nails looked very healthy. I was very pleased with the results.
I also wanted to see how easy it was to take the gels off as at the nail bar it seems to take forever. I was very impressed at how quickly and easily the gel came off. All you need to do is put some of the Remove liquid in a bowl, immerse your nails for up to 5 minutes and when you take them out most of the gel has come off and you just use the lint free pads provide to remove the little that has collected at the edge of the nail. It took me no effort at all and I think this alone is a huge bonus. A few drops of cuticle oil and my nails were as healthy looking as they ever were.

I would most certainly recommend Rokit to anyone who loves their nails to look good but not have to bother putting new varnish on nearly every day.
It’s an easy to use but very effective product.
Disclosure: I was sent samples in return for an honest review. This post was written by Fiona C as a guest blog for me – thank you very much Fiona x


These look fab, definitely worth the extra time to put them on